Plug Plants Explained — Full Indoor Care Guide for Tropicals from TC to Maturity

What Are Plug Plants?
Plug plants, also called starter plants or houseplant plugs, are small, rooted plants grown in compact substrate blocks. They are younger than baby plants, usually shipped without a nursery pot, and need careful acclimation before they grow steadily indoors.
Most indoor plug plants are grown in small plugs of coco coir, fine fibre mix, or another light propagation substrate. Many are around 2–4 cm wide, though size can vary by grower, genus, and production method.
Unlike seeds or unrooted cuttings, plug plants already have roots and leaves. The main job after arrival is not propagation, but stability: gentle moisture, bright indirect light, warm indoor conditions, and careful potting into a small container.
Plug plants are especially useful for growers who want to start with younger tropical plants such as Alocasia, Philodendron, Anthurium, Goeppertia, Syngonium, or Scindapsus. They are affordable, compact, and rewarding, but they are not as forgiving as established plants. Small roots react quickly to dry air, cold, wet substrate, and rough handling.
Table of Contents
- First-month plug plant care
- Where plug plants come from
- Plug plants vs baby plants
- Unpacking and first checks
- Acclimating plug plants indoors
- Potting plug plants
- Watering plug plants
- Light for plug plants
- Humidity and airflow
- Fertilizing young plugs
- Common plug plant mistakes
- Root development and repotting
- Care tips by genus
- Plug plant FAQs
Your Plug Plant’s First Month Indoors
The first month is the most sensitive stage. A plug plant is already rooted, but it still needs time to adjust from nursery conditions to normal indoor air.
- Day 1: Unpack immediately, inspect leaves, stems, roots, and substrate. Keep new plugs away from your main plant collection.
- Days 1–7: Keep conditions stable. Aim for bright indirect light, gentle warmth, lightly moist substrate, and moderate humidity.
- Week 1: Pot into a small container once the plug is firm, hydrated, and intact. Use airy, lightly pre-moistened substrate.
- Weeks 2–4: Watch for new roots, new leaves, improved firmness, or faster water uptake. Do not fertilize unless growth is clearly active.
- After new growth: Start very diluted liquid fertilizer and keep checking root development before moving to a larger pot.
Slow, stable care works better than constant adjustments. Most early failures happen because plugs are watered too often, potted too large, fertilized too soon, or kept in air that is either too dry or too stagnant.

Where Do Plug Plants Come From?
Plug plants can come from several propagation methods. Many rare or high-demand houseplants begin as tissue-cultured plantlets, while others are produced from cuttings, divisions, young offsets, or corms. What they have in common is the plug stage: a small, rooted plant grown on in compact substrate before shipping.
Tissue Culture Plants
In tissue culture, small pieces of plant tissue, called explants, are grown under sterile lab conditions on nutrient medium. Over time, they form young plantlets with tiny shoots and roots. These plantlets are then moved out of sterile lab vessels and acclimated in warm, humid growing conditions.
Tissue culture helps growers produce many young plants from selected stock and can make rare or slow-to-produce plants more available. It does not mean a plug plant is sterile by the time it reaches your home. Once plantlets are grown in substrate and greenhouse conditions, they should be treated like any other young houseplant: inspect them, isolate them, and give them stable care.
Traditional Propagation
Some plug plants are produced from cuttings, divisions, offsets, or corms. This is common for plants that root reliably or divide naturally, including many Syngonium, Scindapsus, Goeppertia, and Alocasia types.
These young plants root directly into a small plug tray and grow on until they are stable enough for shipping. They may not have the same background as tissue-cultured plants, but care after arrival is very similar.
Why Grow Plug Plants?
- Already rooted: plugs skip the most uncertain stage of rooting an unrooted cutting.
- Compact and affordable: they make many tropical houseplants easier to start from a young stage.
- Easy to ship: small plugs need less space and less pot weight than potted plants.
- Good for hands-on growers: you can watch roots, leaves, and growth habit develop early.
- Often available sooner: some rare or newly produced plants appear as plugs before larger specimens are widely available.
Plug plants are not shortcuts to instant large plants. They are small, sensitive starters that reward careful growers.
Plug Plants vs Baby Plants
Plug plants and baby plants are both young, but they are not the same. The main difference is how established they are when they arrive.
| Feature | Plug Plant | Baby Plant |
|---|---|---|
| Development stage | Very young, recently rooted | Young but more established |
| Propagation background | Tissue culture, cuttings, divisions, offsets, or corms | Often an older plug, young division, or small nursery-grown plant |
| Shipping format | Usually unpotted, in a compact substrate plug | Usually potted in a small nursery pot |
| Root system | Rooted, but still small and sensitive | More developed and more stable |
| Care needs | Needs careful acclimation, humidity control, and gentle watering | More forgiving in normal indoor conditions |
| Best for | Growers who enjoy early-stage plant care | Anyone wanting a small plant with less acclimation risk |
Choose plug plants if you enjoy raising plants from an early stage. Choose baby plants if you want something small but already better settled. For a lower-risk start, browse tropical plug and baby plants and choose based on your space, light, and care routine.
Because many plugs are still early-stage plants, their first leaves may not show adult leaf shape yet; see how heteroblasty affects young houseplants before comparing a starter plant with mature photos.

How to Unpack Plug Plants Safely
Plug plants are tougher than unrooted cuttings, but they are still vulnerable after shipping. Open the parcel as soon as it arrives so the plant is not left in dark, damp packaging longer than necessary.
Unpacking Steps
- Open packaging carefully and remove padding without tugging the plant.
- Handle the plant by the plug base whenever possible. Support leaves gently if needed, but avoid pulling petioles or pinching soft stems.
- If the plant is wrapped in a humidity sleeve, open it gradually rather than exposing leaves to dry air all at once.
- Check labels immediately. Young plugs can look very similar, especially in early growth.
- Keep new arrivals away from your main plant collection for at least 10–14 days.
First Health Check
| Checkpoint | Usually Normal | Needs Attention |
|---|---|---|
| Leaves | Slight yellowing, limp tips, one older leaf fading | Black, mushy, fully collapsed leaves |
| Stem or crown | Firm, upright, not sour-smelling | Soft, black, wet, sour-smelling, or falling apart |
| Roots | White, cream, beige, or light tan roots | Black, mushy, slimy, or foul-smelling roots |
| Plug medium | Lightly moist and holding shape | Bone-dry, crumbling, waterlogged, or visibly mouldy |
If the Plug Feels Dry
Lightly moisten the plug with room-temperature water. Do not soak it unless it has become hydrophobic and water runs straight off. A dry plug needs slow rehydration, not flooding.
If the plug has pulled away from the roots or crumbles badly, pot it sooner rather than leaving roots exposed.

What to Do With Plug Mesh
Some plug plants arrive with mesh or fibre around the root ball. Treat it based on material and root condition.
- Soft brown fibre or clearly biodegradable mesh: leave it on, or make one or two small vertical cuts if it feels tight.
- Rigid plastic or stiff white mesh: moisten the plug first, then cut and remove it carefully if roots are not too embedded.
- Roots growing strongly through mesh: do not rip. Cut only what releases easily and leave the rest if removal would tear roots.
Never peel dry mesh from dry roots. Young roots break easily, and root damage slows acclimation.

How to Acclimate Plug Plants Indoors
Plug plants usually come from warm, humid growing conditions. Normal indoor air is drier, less consistent, and often darker. Acclimation helps the plant adjust without losing too much moisture or sitting wet for too long.
Best Setup for the First 7–14 Days
- Light: bright indirect light, not direct midday sun.
- Temperature: steady warmth, ideally around 18–24 °C for most tropical plugs.
- Humidity: around 50–70% near the plant, depending on genus.
- Airflow: gentle air movement, never a direct blast from a fan, heater, or air conditioner.
- Isolation: keep away from your main plant collection while you check for pests, mould, or shipping stress.
Most tropical plugs settle best with steady warmth, no cold drafts, and humidity that does not swing sharply between dry and damp.
When to Pot After Arrival
Most firm, intact plugs can be potted within a few days of arrival. If you wait, keep the plug lightly moist and protected from dry air. Do not leave an unpotted plug exposed on a shelf.
| Situation | Best Action |
|---|---|
| Plug is firm, moist, and holding shape | Let it acclimate for 3–7 days, then pot carefully |
| Roots are exposed or drying | Pot sooner into lightly moist substrate |
| Plug is falling apart | Pot immediately and keep conditions stable |
| Stem base is soft, black, or sour-smelling | Inspect roots before potting and remove rotten tissue if needed |
Using a Temporary Dome
A clear cup, propagation dome, or loose humidity cover can help if indoor humidity is under 50% or leaves are shrivelling. It should not become sealed, stagnant air.
- Vent daily.
- Keep leaves from pressing against wet plastic.
- Remove the dome gradually once leaves look firm and new growth starts.
- Skip domes in already humid rooms or if mould appears.
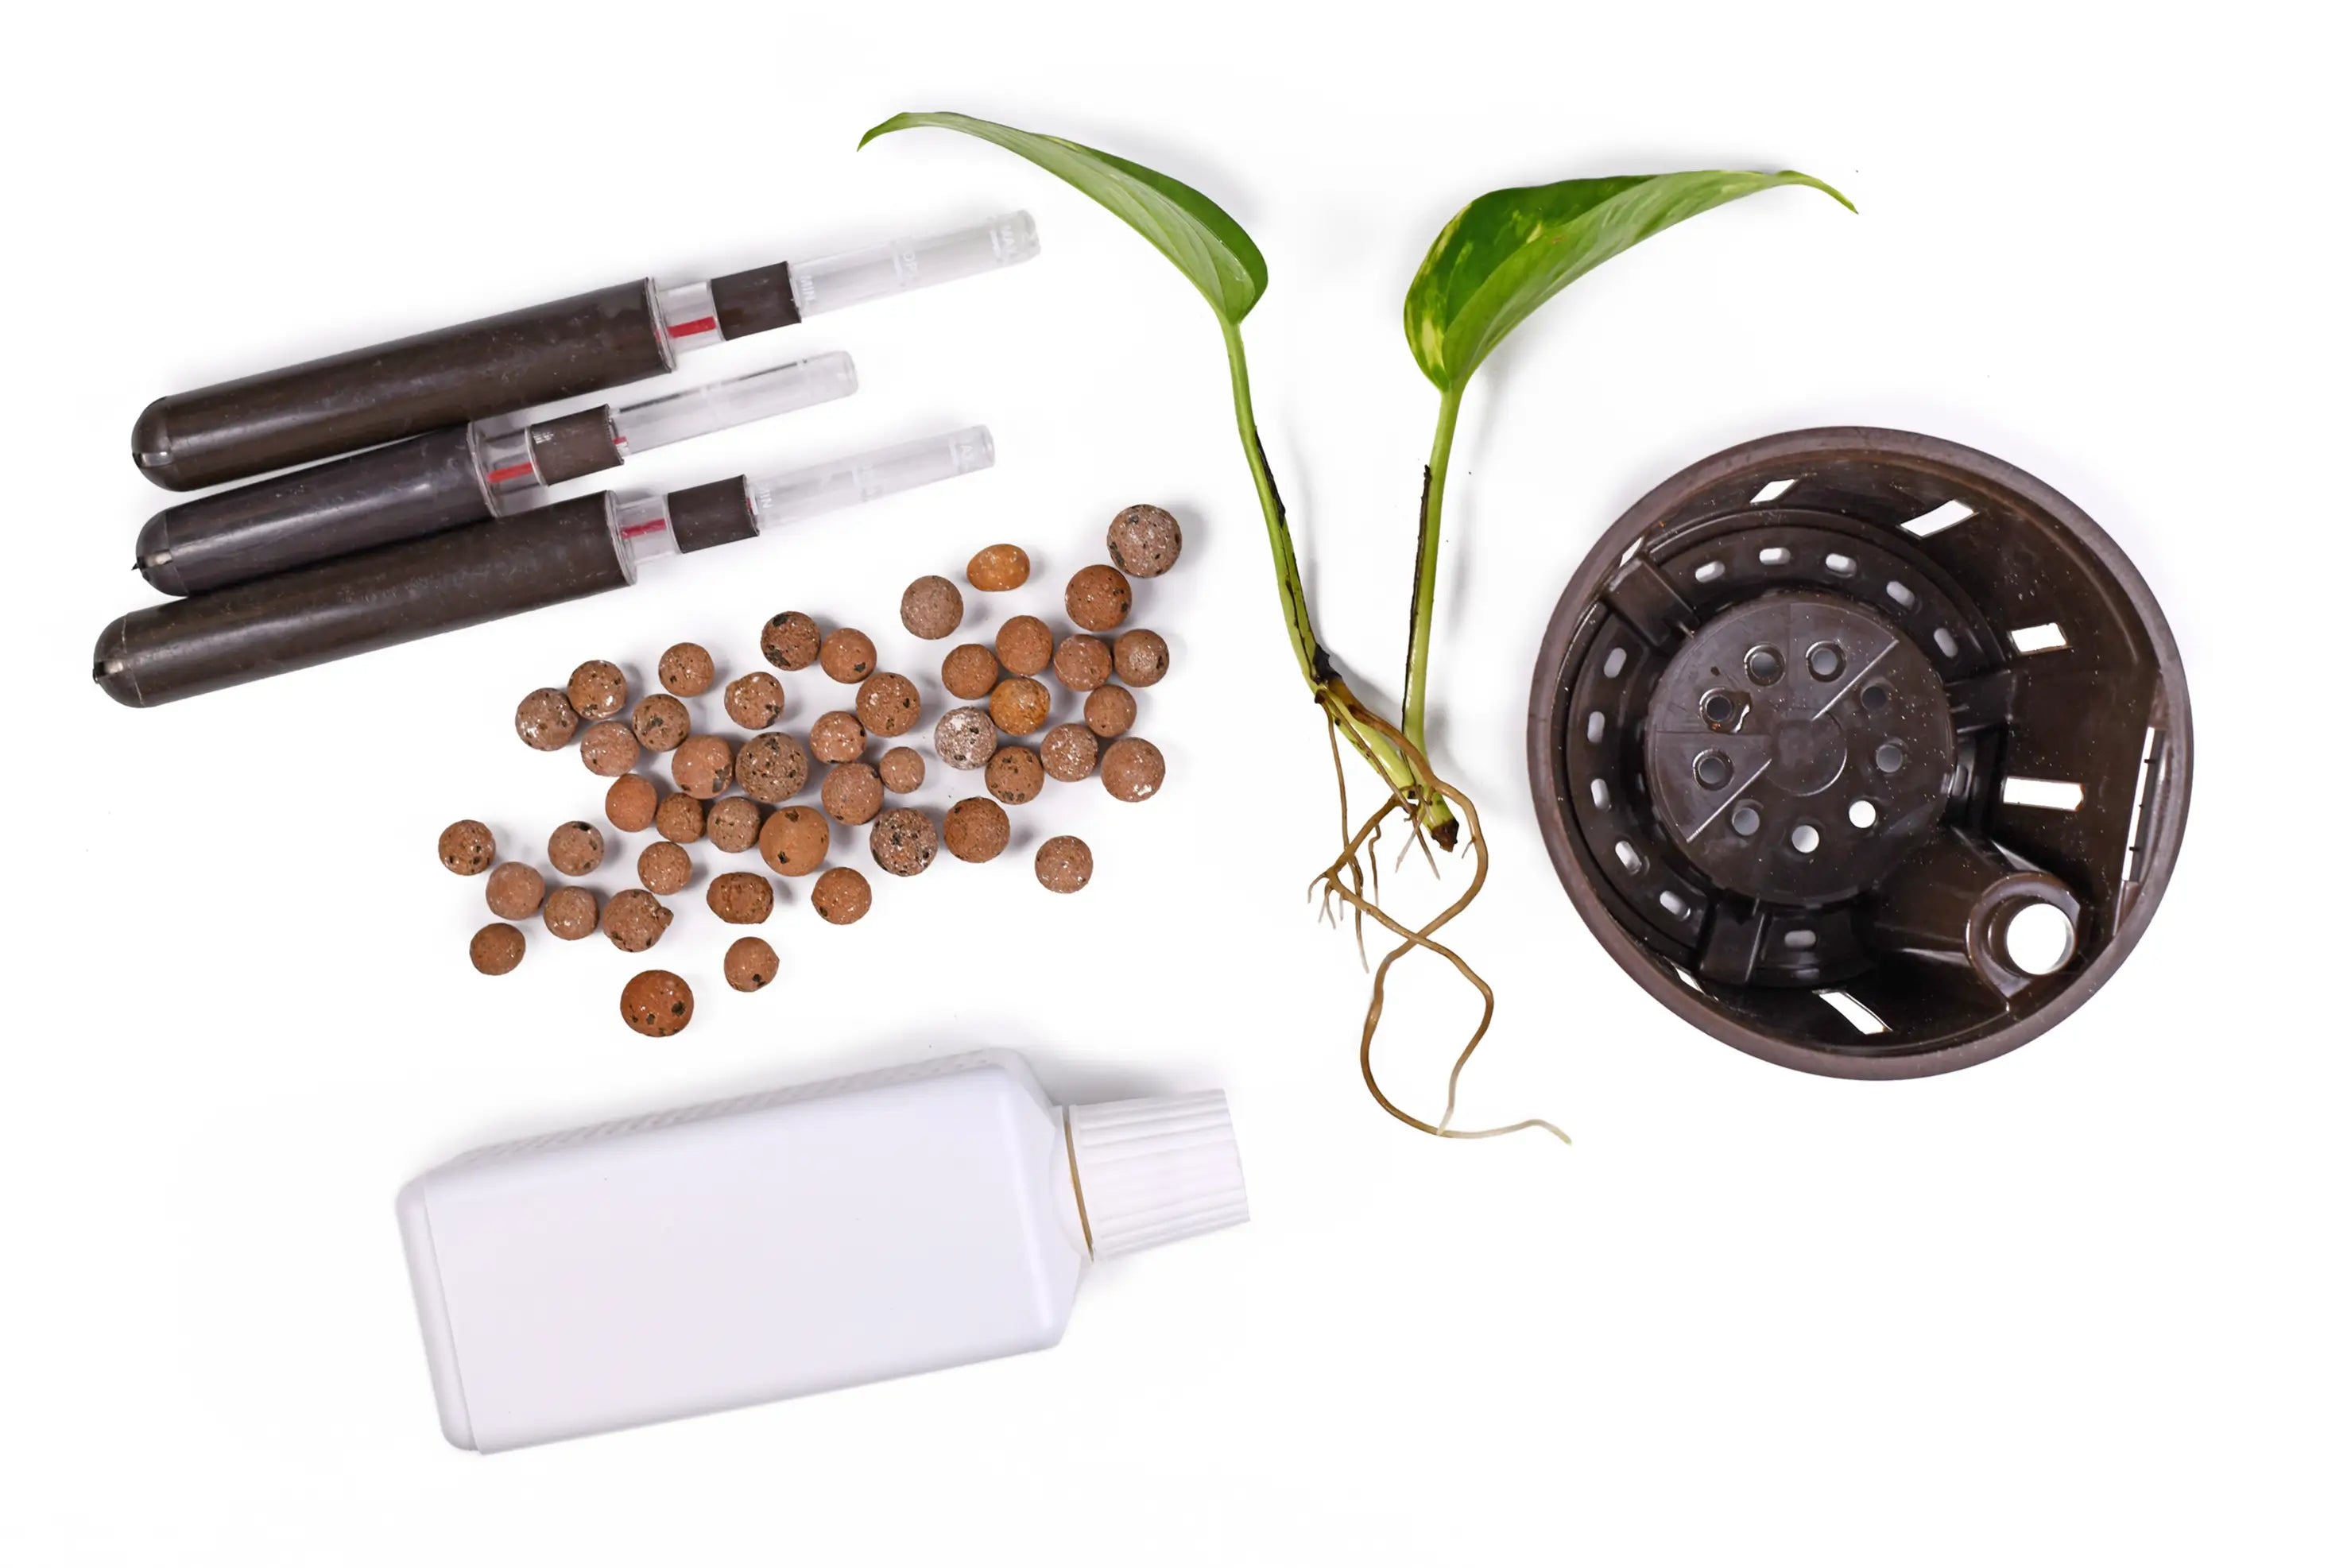
Potting Plug Plants the Right Way
Good potting is simple: use a small pot, airy substrate, and gentle hands. Oversized pots and dense mixes hold too much water around young roots.
Best Pot Size
- Use a pot around 5–7 cm wide, or only 2–3 cm larger than the plug.
- Choose drainage holes every time.
- Use a small plastic nursery pot if possible. Transparent pots make root checks easier.
- Keep decorative cachepots separate so excess water can drain away fully.
- Avoid terracotta at plug stage unless your room is very humid and you monitor moisture closely.
Best Substrate for Plug Plants
Young roots need oxygen as much as moisture. Use a light, peat-free indoor plant mix that holds gentle moisture without turning compact or soggy.
Simple plug plant mix by volume:
- 40% fine coco coir or fine coconut fibre
- 30% perlite or pumice
- 20% fine orchid bark or coco chips
- 10% fine mineral component such as zeolite, lava rock, or charcoal
For very small plugs, keep particles fine enough that roots stay in contact with moisture. For aroids with thicker roots, slightly chunkier texture is fine once the plant is established.
Avoid:
- Dense general-purpose potting soil
- Compost-heavy mixes
- Large bark chunks around tiny roots
- Slow-release fertilizer pellets at potting
- Wet substrate packed tightly around the crown

Step-by-Step Potting
- Lightly moisten substrate so it feels damp but not wet.
- Fill the pot about two-thirds full.
- Make a small hole in the centre, just deep enough for the plug.
- Place the plug at the same depth it was growing before.
- Keep the crown or stem base just above the substrate surface.
- Backfill gently without compacting the mix.
- Water lightly around the edge of the plug until a little water drains out.
- Let the pot drain fully before placing it back in its growing spot.
Do not bury leaves, cover the crown, press the mix hard, or fertilize straight after potting.
How to Water Plug Plants Indoors
Watering is where most plug plant problems start. Small roots cannot use water from a large wet pot, but they also dry out faster than established root systems. Aim for lightly moist and airy, not wet and heavy.
What Moisture Balance Feels Like
- The top layer can dry slightly between waterings.
- The root zone should stay gently damp, not soaked.
- The pot should feel lightly heavy after watering, then gradually lighter.
- Water should drain freely and never sit in the cachepot.
Wet substrate blocks oxygen from roots and can lead to root decline. Bone-dry plugs can shrink away from roots and become hard to rehydrate. Both extremes slow growth.
How Often to Water
There is no fixed schedule. Many plugs need water every few days in warm, bright conditions, but the pot should decide the timing, not a calendar.
- Check moisture every 2–3 days at first.
- Water when the top 1–2 cm feels slightly dry.
- Water less often in lower light, cooler rooms, or heavier substrate.
- Water more carefully in very small pots, airy mixes, or warm grow-light setups.
For many aroid plugs, slightly drier is safer than soggy. For Goeppertia and other moisture-sensitive foliage plants, keep the root zone evenly lightly moist, never wet or bone-dry.
How to Water Properly
- Use room-temperature water.
- Pour slowly around the plug rather than directly into the crown.
- Stop when a small amount drains from the bottom.
- Empty the cachepot or saucer after draining.
- Wait until the top layer dries slightly before watering again.
For Goeppertia and other sensitive foliage plants, filtered, rain, or low-mineral water is safer if your tap water is hard.
Watering Troubleshooting
| Symptom | Likely Cause | What to Do |
|---|---|---|
| Mushy base or black stem | Too wet, poor airflow, or buried crown | Unpot carefully, remove rotten tissue, repot into airy mix |
| Yellowing from lower leaves | Low light and wet substrate | Move brighter, let mix dry slightly, reduce watering |
| Drooping with crispy edges | Dry plug or low humidity | Rehydrate slowly and raise local humidity |
| Plug pulling away from pot sides | Chronic dryness | Water slowly in stages until substrate absorbs moisture again |
| Fungus gnats or green algae | Surface stays wet too long | Improve airflow, reduce wetness, and avoid organic overfeeding |
Light for Plug Plants Indoors
Plug plants need enough light to produce roots and leaves, but young foliage can scorch in harsh direct sun. Bright indirect light is the safest target for most tropical starter plants.
Low light slows water use. When substrate stays wet for too long, root problems become more likely. Good light helps plugs use moisture more steadily and grow with stronger stems.
Good Indoor Light Positions
- Close to an east-facing window with soft morning sun.
- Near a south- or west-facing window with a sheer curtain.
- Within about 1 m of a bright window, but out of direct midday sun.
- Under a full-spectrum white LED grow light if natural light is weak.
A weak but visible shadow is a better sign than the “can I read here?” test. A room can be bright enough for reading and still too dim for active plug growth.
For a more accurate light check, use our bright indirect light guide before choosing a permanent spot.
Using Grow Lights
- Choose a full-spectrum white LED, usually 4000–6500 K.
- Place it around 30–50 cm above the plant, depending on fixture strength.
- Run it for 10–12 hours daily with a timer.
- Watch leaves for bleaching, curling, or dry patches if light is too close.
Red and blue grow lights can grow plants, but full-spectrum white LEDs are easier to live with and make it easier to check leaf colour, pests, and stress signs.
Signs Light Is Wrong
| Symptom | Likely Issue | Fix |
|---|---|---|
| Long, weak, leaning stems | Too little light | Move closer to bright indirect light or add a grow light |
| Pale lower leaves and wet substrate | Low light plus too much water | Improve light and water less often |
| Bleached patches or dry spots | Too much direct sun or grow light too close | Filter light or increase distance |
| No visible progress after several weeks | Often too little light, cool roots, or stress after shipping | Check light, warmth, roots, and watering before changing everything |
Rotate pots a quarter turn every few days if growth leans strongly toward one side.
Humidity and Airflow for Plug Plants
Humidity helps young leaves stay hydrated while small roots settle in. Airflow keeps that humidity from becoming stagnant. Plug plants need both.
Useful Humidity Targets
| Plant Group | Helpful Local Humidity |
|---|---|
| Alocasia and Goeppertia | 60–75% |
| Philodendron, Syngonium, Scindapsus | 50–70% |
| Anthurium | 55–70% |
These values refer to the area around the plant, not necessarily the whole room. A small hygrometer near your plugs is more useful than guessing.
How to Raise Humidity Without Overdoing It
- Group plants together to create a small microclimate.
- Keep plugs away from radiators, heaters, vents, and cold windows.
- Use a humidity tray for a small local boost, but do not let pots sit in water.
- Use a temporary clear cover only when air is too dry, and vent it daily.
- Use a humidifier if your room stays very dry and you grow several tropical plants.
Misting is not reliable humidity control. It briefly wets leaf surfaces but does not create stable air humidity for long.
Why Airflow Matters
High humidity without airflow can encourage mould, algae, and bacterial rot. The goal is gentle air movement, not a draft.
- Use a small fan on low, aimed away from the plant.
- Vent covered plants daily.
- Avoid sealed glass domes for newly potted plugs.
- Let substrate surfaces breathe between waterings.
Humidity and Airflow Warning Signs
| Symptom | Likely Issue | Fix |
|---|---|---|
| Crispy edges | Air too dry, roots drying, or mineral-heavy water | Raise local humidity, check moisture, use low-mineral water for sensitive plants |
| Curled new leaves | Rapid moisture loss or inconsistent watering | Stabilise humidity and avoid drying the plug fully |
| Grey fuzz or mould | Wet surface and stagnant air | Vent more, increase gentle airflow, reduce surface wetness |
| Substrate stays wet for many days | Too little airflow, too large a pot, or too little light | Improve light and airflow; check pot size and substrate |

When and How to Fertilize Plug Plants
Do not fertilize immediately after arrival or potting. Young plugs need active roots before added nutrients are useful. Feeding too soon can stress roots, increase salt buildup, and make wet substrate problems worse.
When to Start
Start fertilizing only after you see clear new growth, such as:
- a new leaf opening,
- new root tips visible through a clear pot or drainage hole,
- stronger water uptake,
- a firmer, more stable plant.
For many plugs, this takes at least 3–4 weeks after potting. Some genera take longer. Do not feed if the plant is limp, stalled, freshly repotted, sitting wet for too long, or recovering from root damage.
Best Fertilizer Approach
- Use a balanced liquid houseplant fertilizer.
- Dilute to ¼–½ of label strength.
- Apply every second or third watering while growth is active and light is adequate.
- Pause feeding if leaf tips burn, substrate smells sour, or growth stalls.
Avoid fertilizer spikes, strong organic brews, compost-heavy top dressing, and slow-release pellets for tiny plugs. Controlled, diluted feeding is safer for young roots.
Signs of Overfeeding
| Problem | Likely Cause | Fix |
|---|---|---|
| Brown or yellow leaf edges | Salt buildup, dry roots, or hard water | Flush gently with clean water and reduce fertilizer strength |
| Burnt tips | Fertilizer too strong for root size | Pause feeding and resume at a weaker dose only after recovery |
| Substrate smells sour | Too much moisture, low oxygen, or excess organic input | Check roots, improve airflow, and stop feeding until stable |
| Fungus gnats increase | Wet organic substrate and overfeeding | Let surface dry slightly, improve airflow, reduce organic inputs |

Common Plug Plant Mistakes
1. Using a Pot That Is Too Large
Small roots cannot dry a large pot quickly. Excess wet substrate reduces oxygen and raises rot risk.
Better: start in a 5–7 cm pot and move up gradually only when roots fill the space.
2. Keeping the Mix Too Wet
Plug plants need moisture, but not soggy substrate. Wet roots decline faster than most leaves show damage.
Better: water when the top layer dries slightly and let every pot drain fully.
3. Moving to a Bigger Pot Too Early
More space does not mean faster growth. It usually means more unused wet substrate around small roots.
Better: repot only when roots are visible around the sides or base, or when the plant clearly outgrows its first pot.
4. Fertilizing Too Soon
Fertilizer cannot replace roots, light, or stable moisture. Feeding a stressed plug often makes problems worse.
Better: wait for clear new growth and start with a very diluted liquid fertilizer.
5. Giving Too Little Light
Low light slows root growth and water use. Substrate then stays wet longer, even if watering seems careful.
Better: place plugs close to bright indirect light or use a full-spectrum white grow light.
6. Sealing Plants in Stagnant Humidity
A dome can help dry plugs, but sealed wet air can invite mould and rot.
Better: vent covers daily and combine humidity with gentle airflow.
7. Pulling at Mesh or Dry Roots
Young roots tear easily, especially when mesh or substrate is dry.
Better: moisten first, cut only what releases easily, and leave attached roots undisturbed.

How to Track Root Development
Leaves are easy to watch, but roots decide whether a plug plant is settling in. Healthy roots help the plant absorb water, support new leaves, and recover from shipping stress.
How to Check Roots Without Unpotting
- Use transparent nursery pots: roots are easier to monitor without disturbance.
- Check drainage holes: new white or cream root tips often appear at the bottom first.
- Lift the pot: as roots develop, water uptake becomes more predictable.
- Use a wooden skewer: check deeper moisture without digging into roots.
Avoid unpotting just to check progress. Disturb the root ball only if you suspect rot, severe dryness, or substrate collapse.
Signs of Healthy Root Progress
| Signal | What It Usually Means |
|---|---|
| New roots visible through clear pot | The plug is expanding into fresh substrate |
| Substrate holds together better | Roots are stabilising the mix |
| Water uptake becomes steadier | Root function is improving |
| New leaf growth starts | The plant has enough root support to grow above soil |
Most healthy plugs show some sign of settling within 2–6 weeks, depending on genus, light, warmth, humidity, and root condition.
Signs of Root Trouble
| Symptom | Likely Problem | What to Do |
|---|---|---|
| Sour smell or slimy roots | Root rot or low oxygen | Unpot carefully, trim rotten tissue, repot into airy mix |
| Mix stays wet for many days | Too little active root mass, low light, or oversized pot | Improve light and airflow; water less often |
| No visible progress after several weeks | Stalled plug | Reassess light, warmth, humidity, and root health |
| Leaves collapse after watering | Roots may be suffocating or damaged | Check roots and substrate before watering again |
When to Repot Again
Move to a larger pot only when roots guide the decision.
- Roots are visible around several sides of the pot.
- Roots emerge strongly from drainage holes.
- The plant becomes unstable because top growth has increased.
- Water runs through unusually fast and roots are visible around the sides or base.
Increase pot size gradually, usually by 2–3 cm. A young plant in a slightly too-small pot is usually safer than a young plant in a pot that stays wet for days.

Plug Plant Care by Genus
Plug plant basics stay the same, but different genera react differently to drying, humidity, temperature, and potting. Use these notes to fine-tune care without changing too many things at once.
Alocasia
Main risk: cold, wet roots.
- Keep warm, ideally around 20–26 °C.
- Use an airy mix and avoid burying the crown.
- Keep humidity around 60–75% if possible.
- Let the top layer dry slightly, but do not let the whole plug dry hard.
- Older leaves may yellow or drop after shipping. A firm base matters more than keeping every old leaf.
Watch for: sudden collapse after cold exposure or overwatering.

Philodendron
Main risk: overpotting.
- Keep in bright indirect light and moderate humidity.
- Let substrate dry slightly between waterings.
- Use a small first pot, even for fast-growing types.
- Crawling types such as Philodendron gloriosum need horizontal space later, not a large pot at plug stage.
Watch for: weak, stretched growth in low light.

Goeppertia, Still Widely Sold as Calathea
Main risk: dry air, hard water, and uneven moisture.
- Keep substrate evenly lightly moist, not wet.
- Use filtered, rain, or low-mineral water if tap water is hard.
- Keep humidity around 60–75% if possible.
- Avoid terracotta at plug stage because it can dry small root balls too quickly.
- Keep airflow gentle. Strong drafts can crisp young leaves.
Watch for: brown edges. Damaged edges will not turn green again, but stable care prevents new damage.
Anthurium
Main risk: dense substrate around thick roots.
- Use an open, airy mix with fine bark, coco chips, and mineral texture.
- Keep humidity around 55–70%.
- Water when the top layer dries slightly.
- Use a small pot, but keep the mix breathable so roots have oxygen.
- Be patient. Anthurium plugs may pause before producing visible new leaves.
Watch for: forcing growth with fertilizer before roots are active.
Other Common Plug Plants
| Genus | Main Focus | Care Note |
|---|---|---|
| Scindapsus | Airy mix and moderate light | Avoid wet substrate around small roots |
| Syngonium | Even moisture and bright indirect light | Usually settles quickly when warm |
| Hoya | Very airy mix and stronger indirect light | Let substrate dry more than aroid plugs |
| Monstera | Warmth, light, and gradual pot increases | Start small and up-pot once roots fill the pot |
| Epipremnum | Bright indirect light and gentle watering | Fast roots, but still avoid oversized pots |
Small differences matter. Change one thing at a time, then watch how the plant responds.
Plug Plant FAQs
What is the difference between plug plants and baby plants?
Plug plants are younger, usually unpotted, and grown in compact substrate plugs. Baby plants are usually one step further along, often already potted and better rooted. Plug plants need more careful acclimation; baby plants are usually easier for beginners.
Can I repot a plug plant right after it arrives?
Yes, if roots are exposed, the plug is falling apart, or substrate is drying too quickly. If the plug is firm, moist, and intact, let it acclimate for a few days before potting.
Should I remove plug mesh?
Remove rigid plastic mesh if it comes away without tearing roots. Soft biodegradable mesh can usually stay on, especially if roots are growing through it. If mesh feels tight, make one or two small vertical cuts after moistening the plug.
Do plug plants need a humidity dome?
Only in dry indoor air or if leaves are shrivelling. A dome must be vented daily. Sealed humidity without airflow can cause mould and rot.
How long does it take plug plants to settle?
Most healthy plugs show some sign of progress within 2–6 weeks. New roots, new leaves, firmer growth, and steadier water uptake are better signs than a fixed date.
My plug has not grown in two weeks. Is that bad?
Not necessarily. Many plugs focus on roots before leaves. If the plant is firm, roots do not smell rotten, and leaves are not collapsing, keep care stable and wait.
My plug dropped its only leaf. Is it dead?
Not always. If the crown, corm, rhizome, or stem base is firm and the plug does not smell rotten, it may regrow. If the base is soft, black, or sour-smelling, recovery is unlikely.
Some roots look glassy or translucent. Is that rot?
Not always. New root tips can look pale, glassy, or translucent. Rot is more likely if roots are mushy, black, slimy, or foul-smelling.
There are dry brown roots sticking out of the bottom. Should I cut them?
Dry, crispy root tips exposed during shipping can be trimmed with clean scissors if they crumble easily. Do not dig into the plug, because healthy inner roots may still be active.

When should I fertilize plug plants?
Wait until you see clear new growth. Then use a balanced liquid houseplant fertilizer at ¼–½ label strength every second or third watering. Skip fertilizer if the plug is stressed, stalled, or staying wet too long.
Can I use a heat mat?
Yes, but use it carefully. Gentle root-zone warmth around 22–26 °C can help warmth-loving tropical plugs, especially Alocasia and Anthurium. Avoid overheating, drying the plug, or placing young leaves too close to strong grow lights.
What is the best pot for plug plants?
A small plastic nursery pot with drainage holes is usually best. Transparent pots are useful because you can watch roots without unpotting. Terracotta often dries too quickly for tiny plugs.
Do plug plants go dormant?
Some plants, especially Alocasia, may slow down or drop older leaves in cooler, darker indoor conditions. Warmth and strong indirect light reduce the chance of a full pause, but some plants still slow naturally. Keep care stable and avoid forcing growth with extra water or fertilizer.

Start Small, Keep Conditions Stable
Plug plants are a practical way to grow tropical houseplants from a young stage without starting from seed or unrooted cuttings. They do best with simple, steady care: a small pot, airy substrate, bright indirect light, gentle humidity, and careful watering.
Do less, but do it consistently. Check roots before changing care, wait for new growth before feeding, and avoid rushing into a larger pot.
Ready to raise a young tropical from the start? Shop Foliage Factory plug and baby plants and choose a small plant that fits your light, space, and care routine.

Leave a comment